
 Login
LoginToday we’ll show you how to draw a nose.
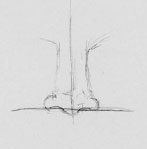
Draw the guidelines for the nose according to the angle of the head.
There should be a line that shows where the center of the bridge of
the nose is, and another that indicates the nostril line.
Draw the basic shape of the bridge, nostrils, and septum (cartilage between the nostrils), showing with a few sketchy lines the top of the tip of the nose as well.
If you prefer, you can even draw a circle to help remind you that the tip of the nose is rounded and protrudes.
Erase the guidelines and begin lightly shading the darkest areas. These will be, depending on the direction and strength of the lighting, in the nostrils, beneath the nose as it casts a shadow on the cheek, and to one side of the bridge of the nose.
There will also be light shading around the bulbous tip of the nose, just as there would be on a ball.
Make sure to leave a highlight on the center of the bridge and on the tip to indicate that these are the highest places on the nose. Let your shading replace any stark lines that you’ve drawn.

Darken the darkest places of the nose further and blend in the other shaded areas using a stomp or tortillon.
Pick out highlights with the kneaded eraser again as needed; study your reference material carefully to determine where the highlights are.


Want To Learn More …
Drawing Made Easy is a simple course which shows you step-by-step how to draw people, hands, eyes, faces and a whole lot more from beginning to end, and a goldmine of sample illustrations for further ideas.
With clear (and fun) instructions on how to draw … you’ll learn at your own pace in the comfort of your home.