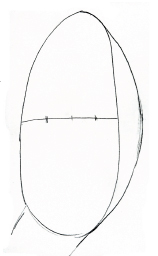
Begin with two shapes; the shape of the fingertips to the wrist without the thumb and that same area with the thumb.
You should have a long, skinny oval for the first area and a lopsided egg shape for the second.
Divide the oval in half and mark off four equally sized fingers. The guideline for the thumb should extend out roughly the same distance as a quarter of the oval, because the thumb and fingers are all about the same width
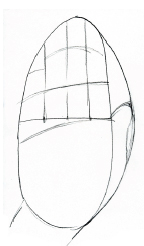
Extend the fingers up from the hatch marks, keeping them parallel to the thumb. The thumb begins to curve away from the hand at the horizontal midline, curves in to form the tip, and then curves out at the knuckle.
The other knuckles should fall in an arc beginning at the right center point and crossing downward. The second joint lies a third of the way up the oval, and a third of the way up again marks the third line of knuckles, with the exception of the pinky.
The pinky is so much shorter than the other fingers that the tip of the pinky lines up with the top knuckle of the ring finger.
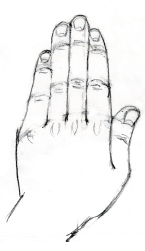
When the guidelines are marked, sketch in rough circles at each knuckle, then erase the guidelines and re-shape the fingers and outside of the hand as needed.
The pinky cuts in from the side so that the outer shape of the hand becomes more tapered and graceful. Each finger should taper up from the base to the tip, and the thumb juts out at the bottom knuckle, then cuts in sharply to the wrist.
When the outer lines are finished, work on details. The base of each fingernail lies halfway between the fingertip and first knuckle.
You may or may not see skin above the nail, but you should always see skin around both sides of the fingernail unless the finger is tilted.
When the fingers are seen straight on, the thumb angles outward, so you will only be able to see a partial thumbnail.
The bottom knuckles can be indicated with skinny “V” lines, and the other knuckles are three lines; one straight between two curves. The knuckles shouldn’t extend to the end of the finger
 Want To Learn More…
Learn how to draw realist hands in different positions and from different angles taught by a real professional artist.
Hand Mastery is generously illustrated showing you step-by-step how to draw hands that look realistic.
With clear (and fun) instructions on how to draw … you’ll learn at your own pace in the comfort of your home.
You get high definition videos with simple and easy to follow written instructions so you know exactly how to make your drawings jump off the page.