One of the easiest ways to create mood and increase the drama in your drawings is to learn how to make intense, flawless blacks.
Use this technique to blacken any part of the portrait, shadows, details, or even entire backgrounds.
Begin by protecting the essential lines. You can do this by taping or indenting the paper depending on the circumstances.
Common lines to protect will be the side of the face that touches the background, flyaway hairs, and the edge of the clothing or arm that touches the background.
When the lines are protected, use a soft graphite pencil (6B or softer) and use smooth strokes to fill in clear up to the tape.
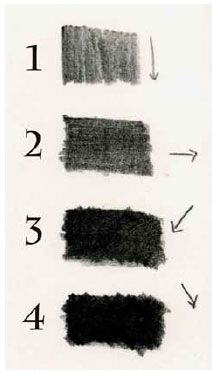
Use constant pressure and overlap each pass slightly so you don’t have any gaps or streaks. See number 1 for reference.
When all of the tone is filled in, cross-hatch your strokes by doing the same thing, but working horizontally.
See number two for reference. Your tone should be darker now, and any gaps or strokes that you wound up with after the first pass should be hidden.
Do the same thing two or more times, changing the direction of the pencil strokes for each pass so that you continually build up cross-hatched layers of even tone.
See numbers three and four for examples. Every pass will make the tone darker, and you should be able to achieve an extremely dark black if you use a soft enough pencil.
If you need to, you can blend that tone with your finger, a stomp, or a chamois cloth to fill in the tone and make it even smoother.
You may need to add an additional pass or two after blending to get the value as dark as you want it.
This is a simple technique, but it will take practice to perfect, so give yourself time and be patient if you don’t get it right the first time.
Once you get it down, you’ll be surprised at how much of an extra punch the intense blacks will give your drawings.
Keep in mind that you don’t have to make the background as black as you possibly can; you often have a highlight side, and if one side of the portrait is strongly lit, that should be reflected in the background as well.
You’ll use the same process whenever you’re building up tone, whether in the background or anywhere else.
Want To Learn More…
 If you want to learn to draw a portrait to a standard you’re happy with, you need to get the basics right from the outset.
So many would-be artist’s overlook this vital foundation when they begin learning to draw. So from there they became disheartened, loose interest and put it in the “too hard” basket.
If you are a quick learner then great but some of us will take a little longer to pick up the required knowledge.
This isn’t a problem. In fact, when you do master it, because you had to work a little harder, you often have a more thorough grasp of the basics.
With that said we have created ‘Photorealistic Portraits’ which builds on your drawing knowledge to take your portrait drawings further.