
 Login
LoginPainting Landscapes
Course Overview and Basics
Even a beginning watercolor painter should invest in quality, 100% cotton rag paper, because it’s much easier to work with. Cheap paper will buckle, tear, and won’t dry flat. So use a watercolor block, or buy individual sheets of good watercolor paper and cut them down to the size you want.
Soak the cut paper in cold water for about ten minutes, then drain off the excess water and fasten the wet paper to a firm backing like gator board or plywood. The cheapest route to go is 1/4 inch plywood and 1/4 inch staples. You’ll need a good staple gun like carpenters use.
Staple the paper to the board with a staple about every two inches, and let that dry completely. The paper will shrink up, or “stretch” as it dries, making a smooth surface for you to paint on.
Class 1
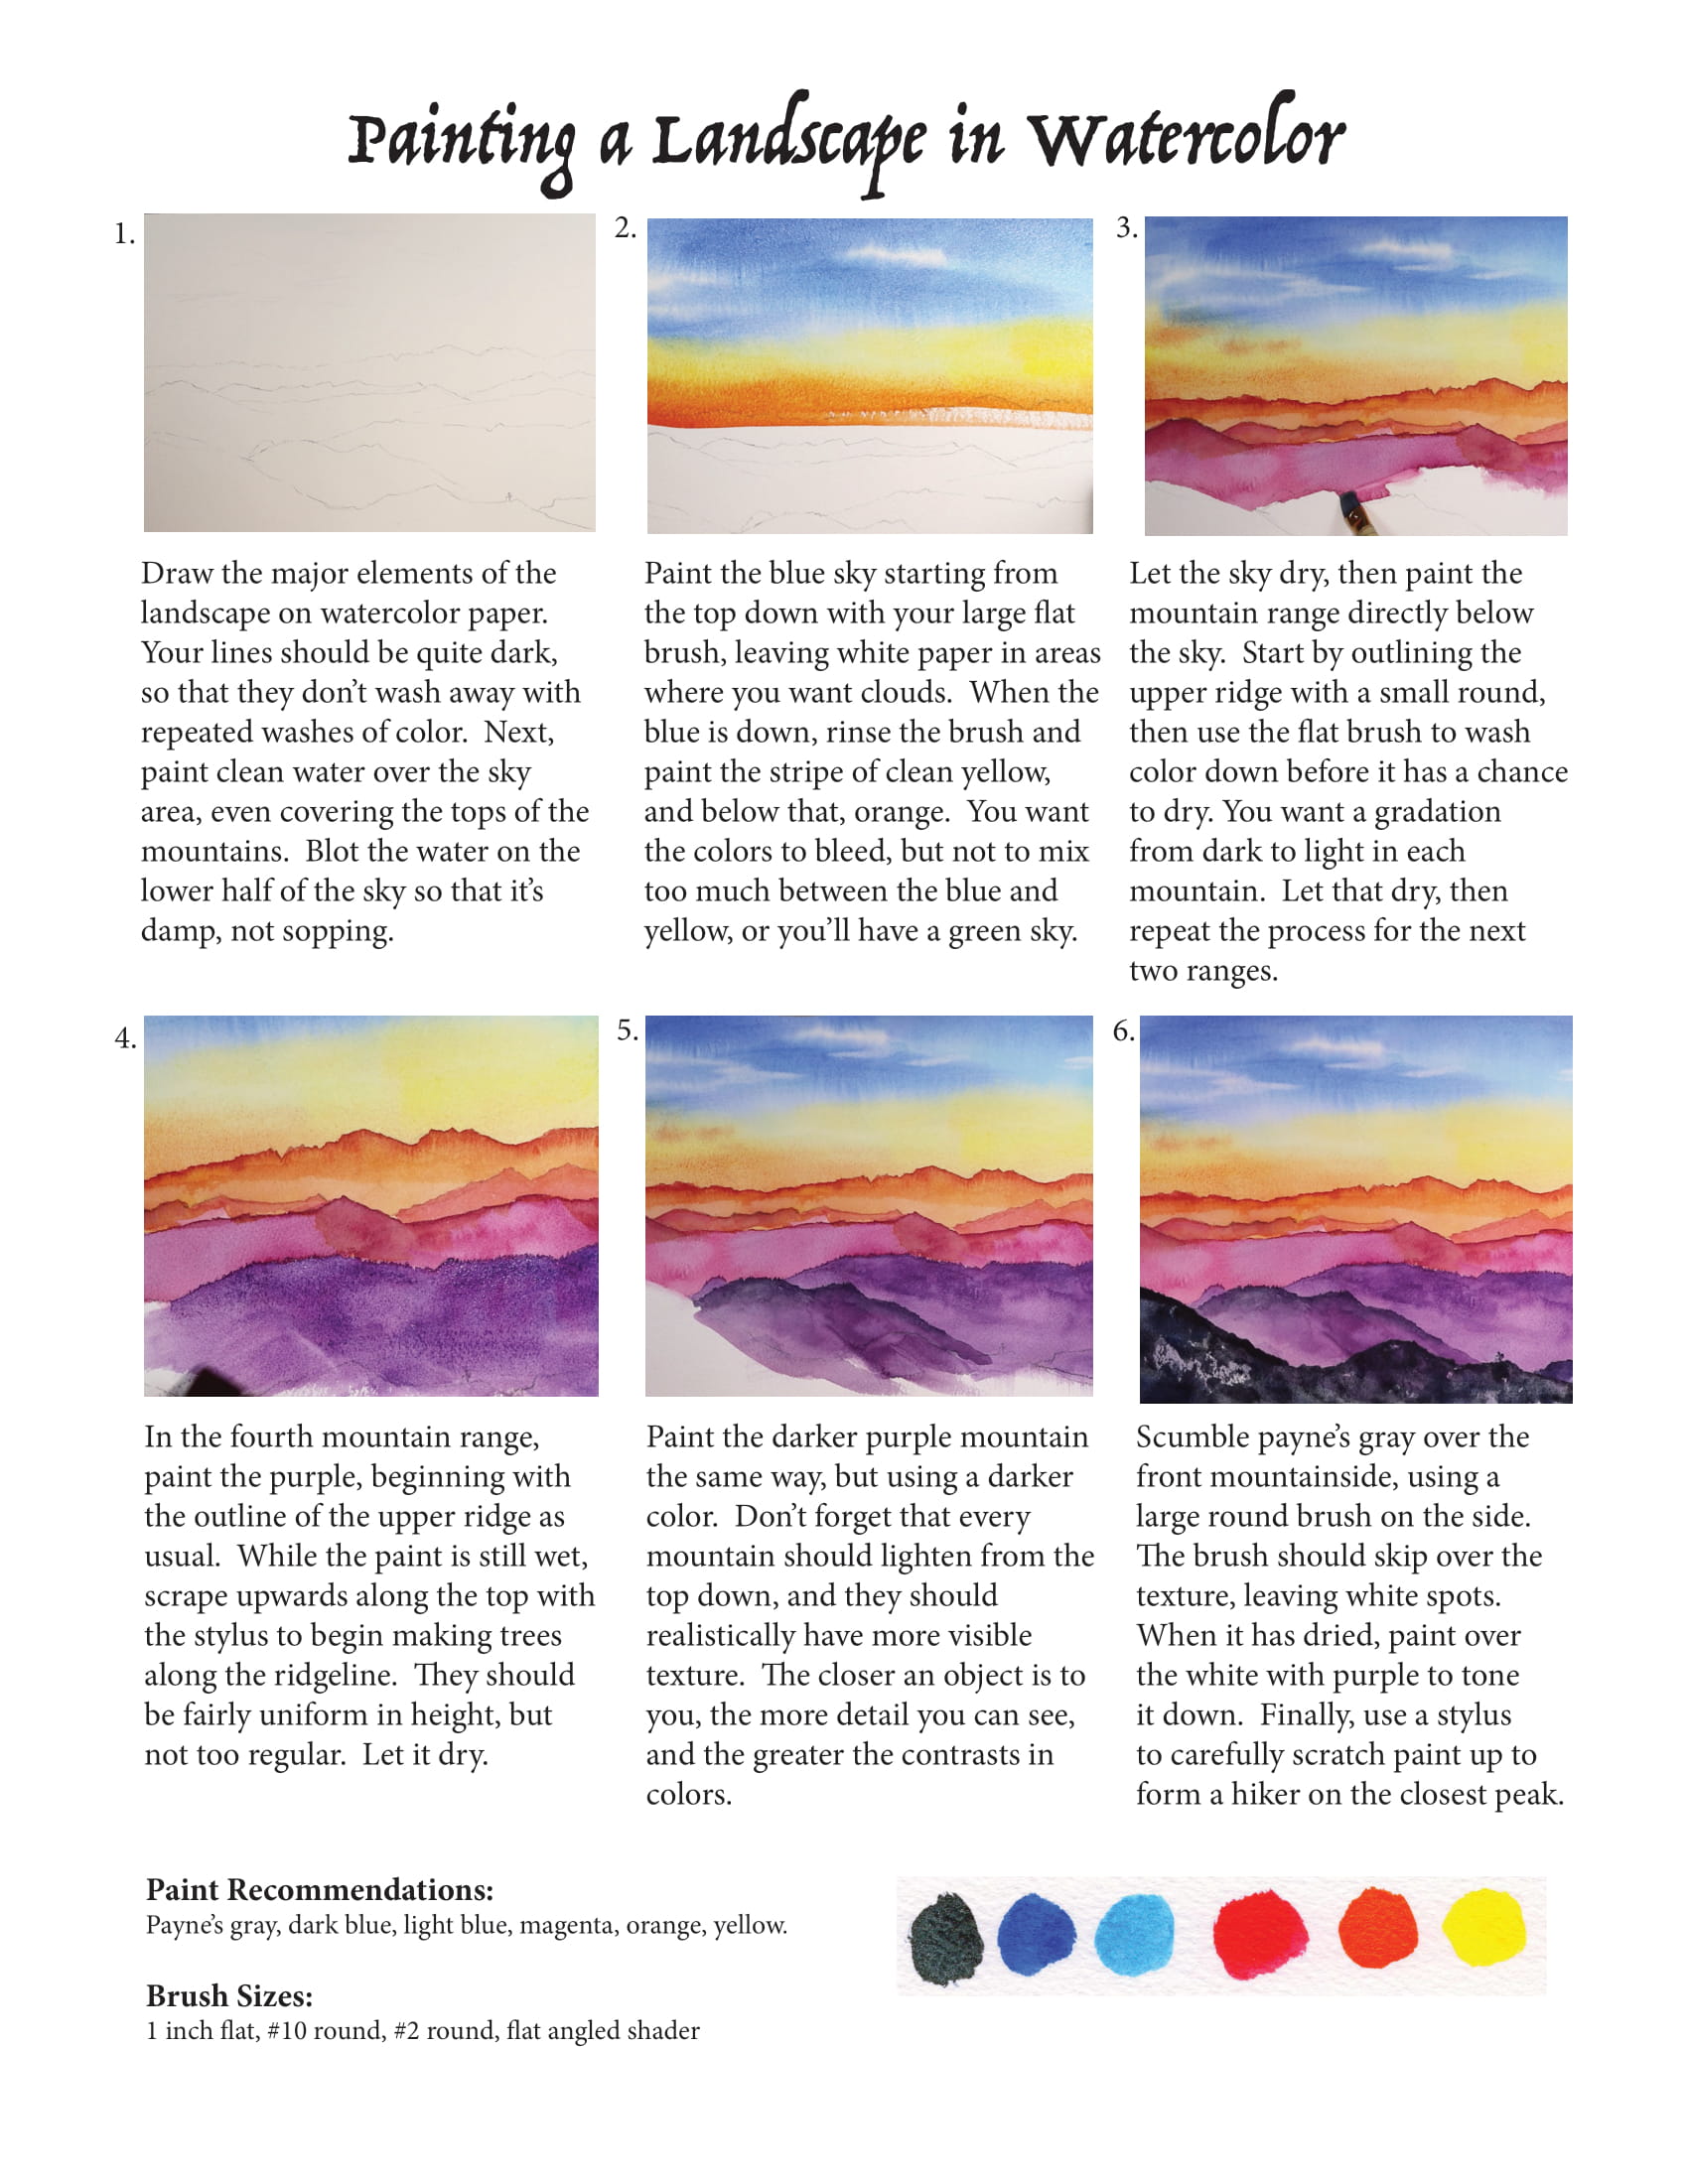
When the paper is dry, you can draw the major elements of the landscape on it.
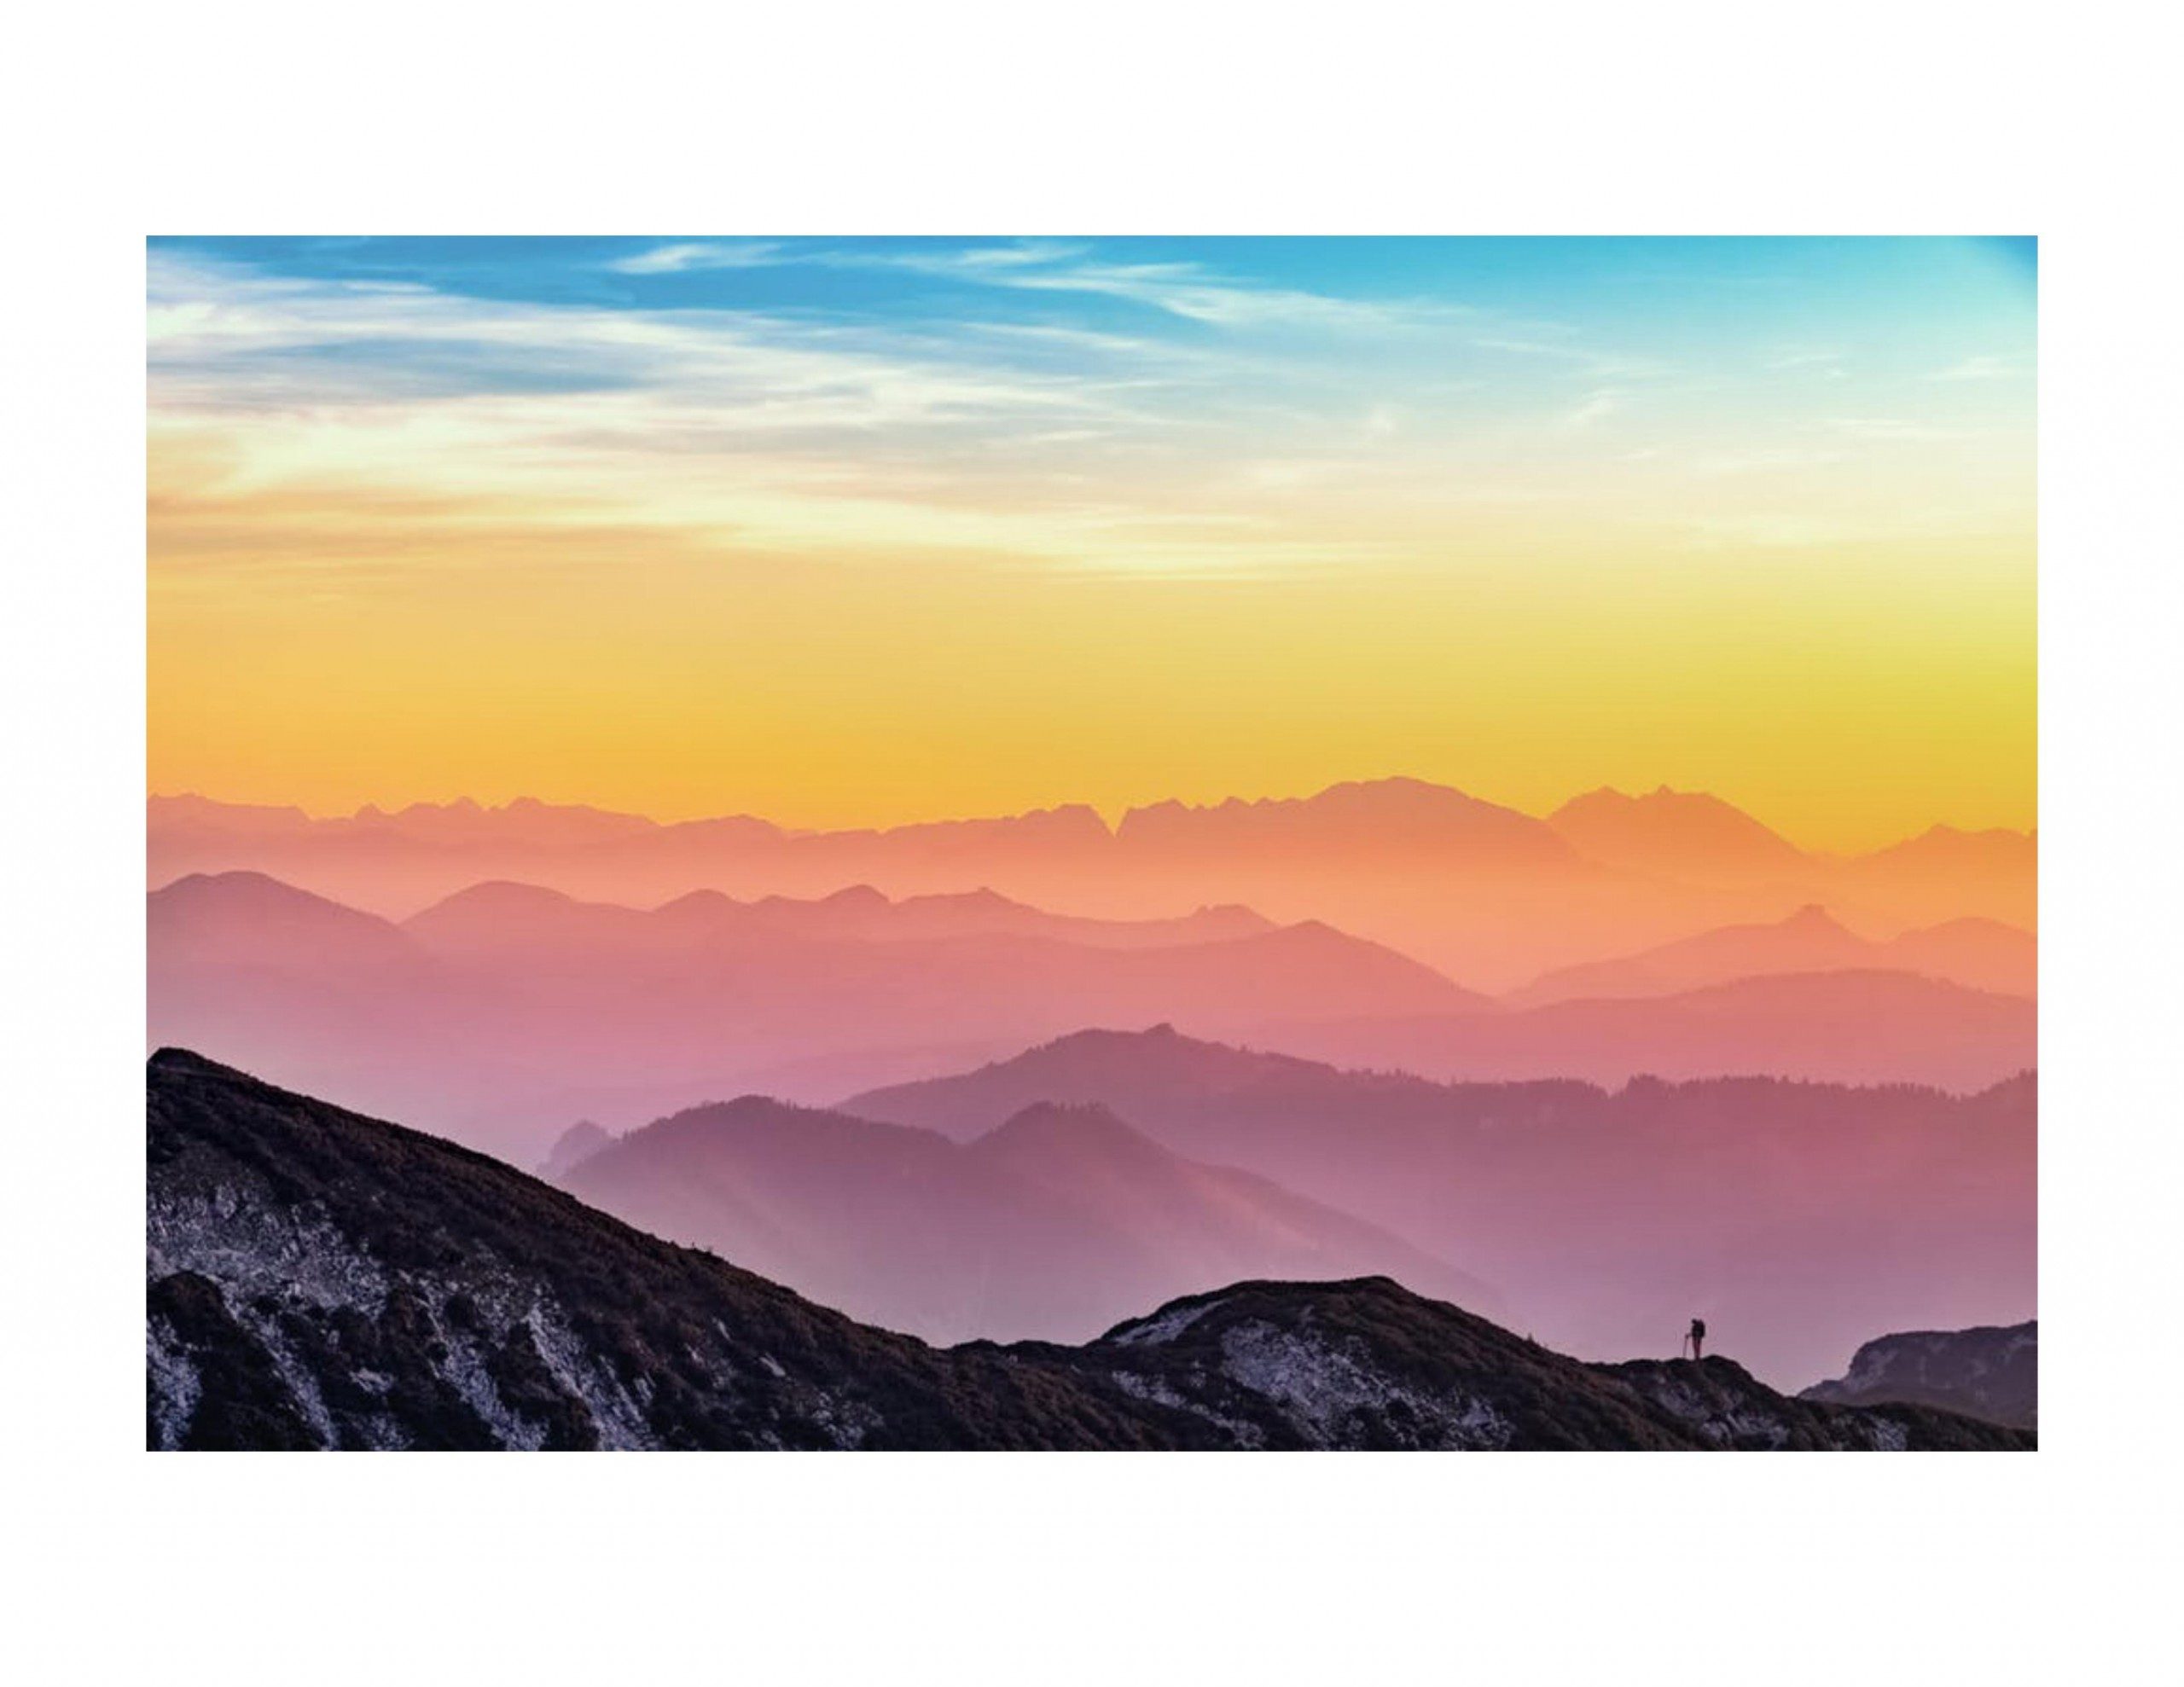
Landscapes tend to be looser in watercolor, so you don’t need to overdraw anything—just get the most important details down, which in this case are the edges of the mountain peaks. The reference for this class is very basic, but will require a lot of color matching and patience!
It’s very important that the colors dry between layers, or your watercolor will run all over the place. If you can’t wait for paint to dry, you can speed up the process with a hair dryer.
Class 2
You always paint watercolors from the back to front, layering foreground elements on top of the background. So begin with the sky, which is the farthest back.
This is a lovely sunset sky, so you’ll need puddles of blue, yellow, and orange all ready to go before you start painting. They need to be painted in stripes that touch each other while still wet so that the colors bleed together, which means you won’t have time to mix colors in the middle.
Class 3
Now you’re going to move forward in the picture plane, painting those mountain ranges from farthest away to closest.
The range farthest from the viewer is orange with a red rim. Start by outlining the rim with a small round brush, then use your flat brush to wash that color straight down to cover the rest of the mountain range before it has a chance to dry. This should give you a nice ombre effect.
Let the mountain dry, then repeat that step for the next two ranges. The process is exactly the same, you’ll just have to carefully color match each mountain before you start painting.
Class 4
The front three mountain ranges are close enough that you can begin to see a bit more texture on the mountain itself and the beginnings of a tree line. To get that effect, you can begin painting the purple mountain along the upper ridge line as usual, but then drag upward through the wet paint with a stylus or small round brush to indicate small trees.
Fill in the rest of the mountainside with color. Remember, the mountains should be darkest at the upper ridge, and lighten gradually as they slope down.
Let it dry.
Class 5
The next closest mountain is still purple, but a darker shade.
Also, because it’s closer, it has trees visible on the upper edge and some more texture on the mountainside itself. Add the trees to the upper ridge the same way that you did for the previous mountain.
For the texture, add a bit of darker purple to form a valley on the mountainside. The tone should still lighten as the mountain slopes down.
Let it dry completely, then move forward to the final mountain.
Class 6
The closest mountain range is very dark; nearly black. You can see both texture on the mountain, and even a
small person hiking the ridge.
Begin by outlining the upper ridge line carefully with a small round brush. Scrape upward through the wet paint to indicate a few pine trees, then switch to a large round (number 10 or so) and scumble Payne’s gray over the mountainside.
Scumbling is a painting technique where you drag fairly dry paint over a dry surface, which leaves a lot of gaps. It makes a texture that is good for rough surfaces, like rocks.
Let the dark paint dry, then paint over the mountain with a thin wash of purple to fill in the white paper.
Class 7
Finish by painting the hiker.
Use a very small brush and paint a dot for the head, a line for the body, and a lump for a bag on the back. Legs and a walking stick are the final two lines.
Keep it simple, and try to do it in just a few strokes rather than getting really close and doing a painstaking job of trying for every detail. You’ll have more success with less effort, surprising though it seems.
Reference Material …
Click here to download reference image
Click here to download step by step instruction handout
To save these to your computer simply right click on the link above and choose the option to “Save As”. Save the file to your desktop for easy access.
 If you wish to download the files to your desktop, simply right click the link below and select ‘save as’
Then select the location you wish to save the files to (either your DESKTOP or MY DOCUMENTS e.t.c.)
Once finished, simply unzip the files (PC use winzip, MAC use stuffit) and your files will be there.
All written material can be opened as a PDF.
All videos files can be opened with VLC Media Player.
Select your download option below …