
 Login
LoginPainting Dogs
Course Overview and Basics
In watercolor painting, the paper itself is very important.
Cheap, wood pulp paper is much harder to work on, so give yourself a break and invest a bit more in quality 100% cotton rag paper. If you use a watercolor block, you don’t need to prepare the paper, but if you are using individual sheets, you’ll need to cut them down to the size you want first, then soak the paper in cold water for about ten minutes.
Let the excess water drip off, then fasten the wet paper to a stiff backing, like 1/2 inch plywood or gator board and let it dry. As it dries, it will shrink up a bit, making the surface nice and smooth to paint on, and less likely to buckle as you add water.
This is called “stretching the paper.”

Class 1
Sketch the outline of the dog lightly on the stretched paper.
Your lines should be easily visible, but possible to erase. At that darkness, the watercolor paint will cover them nicely
Work until you’re perfectly satisfied with the drawing, then paint the entire background with clean water. Use a large flat brush, such as a one-inch, so you can work fairly quickly, but be careful to avoid anywhere that you don’t want the paint to go.
Class 2
Flood the wet background with lots of color.
It will lighten as it dries, so don’t be shy, but do try to keep one side dark and the other lighter for more contrast.
Let two or three colors mix together, and for added interest, play with spraying the wet paint with a water bottle, or sprinkling on some salt.
Class 3
When the background is dry, you can clean up any edges that need softening or lightening by dipping an angled shader brush in clean water and rubbing the area gently, then lifting with a paper towel.
Paint the dog with clean water first, then paint the base tone.
You can establish the beginnings of shadows on the fur even at this early stage if you drop in some darks when the base tone is still damp.
Class 4
When the base coat is dry, you can soften hard edges as needed with the damp angled shader brush again, then do more work on the shadow shapes in the fur.
Make sure to test the color you mix for the shadows on the fur before you paint it down, and stay consistent throughout the painting. For example, if you make a shadow color by adding brown to the base color, all of the shadows should be made that way.
You can also make shadow colors by adding blue, or purple, or anything else you want, but stay consistent in your color family choice or the painting will look wrong.
Class 5
Now you can start adding details to the face and fur.
Work up the details in layers across the whole dog at once, rather than choosing one feature and working it up to completion, then moving on to the next feature.
By working in layers, you can make adjustments more easily because the level of realism will stay more balanced. Add darks to the eyes, nose, and mouth, being careful to leave highlights wherever you see them on the reference.
Even if you can’t see a pupil in the dog’s eyes on the reference, make sure to keep one in your painting.
Class 6
Use a small round brush or a rigger brush to develop some flyaway hairs around the outside of the fur, as well as in the ears and body of the fur.
You can also develop hairs by pulling out white lines with a damp angled shader brush.
Blot the color when it’s still wet to lift out the highlight. Remember to take frequent breaks as you work so you can come back with fresh eyes and see where the painting needs to be further developed and where things are working well.
Class 7
Finish with the cast shadow under the dog. This will make the dog look like it’s sitting on the ground rather than floating in space.
Shadows are darkest closest to the object that they’re cast from, and lighten as they move away.
Keep in mind as you paint shadows that the light source needs to be consistent throughout the painting! If the dog is lit from a light source on the left, the shadow underneath will stretch to the right.
If you’re not sure, just pay close attention to your reference, and look for the shapes of the shadows and highlights on the dog and on the floor.
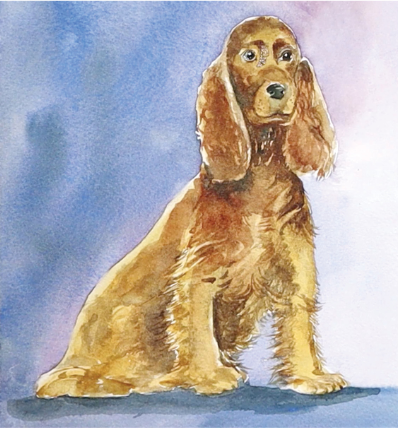
Reference Material …
Click here to download reference image
Click here to download step by step instruction handout
To save these to your computer simply right click on the link above and choose
the option to “Save As”. Save the file to your desktop for easy access.
 If you wish to download the files to your desktop, simply right click the link below and select ‘save as’
Then select the location you wish to save the files to (either your DESKTOP or MY DOCUMENTS e.t.c.)
Once finished, simply unzip the files (PC use winzip, MAC use stuffit) and your files will be there.
All written material can be opened as a PDF.
All videos files can be opened with VLC Media Player.
Select your download option below …