
 Login
LoginOne of the key elements in making realistic portraits is starting with a smooth base tone for the skin color.
Unless your drawing is very high contrast, the skin is going to have at least some tone on it, and that tone needs to be blended smooth before you can start to develop shadow shapes.
Begin by using a graph and interior guidelines to place the large shapes like the head and shoulders, and the smaller shapes like the eyes, nose, mouth, and hair line.
When the features are well-drawn and the face is recognizable, cover all the skin tone with an even pass of charcoal or graphite.
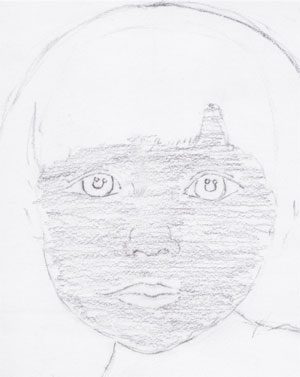
Depending on how dark the skin tone is supposed to be, choose a pencil that is medium to very soft.
Softer pencils will deliver darker tones without requiring you to press harder. It’s very important to try to minimize your visible lines in this step, or your skin tone will still have lines in it even after blending.
Follow the contours of the face as you put down tone, and keep all the strokes in one consistent direction.
Keep the curves of the face in mind as you work, and try to imagine how the pencil would move if you were covering a real, three-dimensional face with pencil tone.
Next, use a clean chamois cloth or white felt wrapped around your finger to blend all that tone smooth.
If you put the tone down evenly and didn’t press too hard in the last step, all of the visible pencil lines should be blended out in this stage.
Use small circle strokes or wipe around the features somewhat carefully to preserve the lines of the features as best you can.
You will need to re-draw some of the lines at the end of this phase, but you want to avoid wiping all of your hard work away completely.
This is how the face should look after the first pass of blending with a chamois or felt.
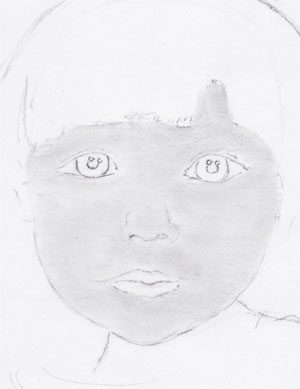
Notice that you can still see the lines of the features, but that they’re not too dark.
In the steps to follow in drawing this portrait, many of those lines will be blended or blotted out completely, so they have to be kept light enough to erase.
Tone in the eyes, nose, and lips will be added in the next step, and the first pass of shadow shapes that fall over everything will be rendered.
If there are strong areas of highlight on the face, those will be avoided from the very beginning.
It’s easier to avoid brights than to try and pick them out with your kneaded eraser later, especially if the bright areas are fairly large.
Don’t forget, the skin tone is different from shadows on the skin tone.
Skin tone is the base of the flesh color. It should be a mid tone; neither as light as the brightest places on the face nor as dark as the shadows.
After the base skin tone is put down and blended smooth, you can begin building up the shadow shapes on top of that base tone.
Working in layers like that will help ensure smooth, realistic passes instead of overly dark patches of smeary tone.
Want To Learn More…
 Learn how to add life to your pencil portraits.
Did you know that a portrait can still look realistic and striking with very little blending by paying attention to shapes and lighting?
Something as simple as that can make a huge difference in your drawings and we can show you plenty of helpful techniques to add life to your pencil portraits.