Learning how to make life-like portraits begins with accurate shapes and ends with realistic lighting.
There’s more to lighting than simply finding highlights and shadows.
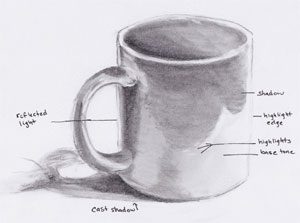
As this illustration of a simple white mug shows, light plays on the surface of a three-dimensional object in ways you might not expect.
Careful observation is the key to capturing the subtleties of light.
Look for four basic tones on any object that you draw: the mid-tone, highlights, shadows, and reflected light.
The mid tone, or base tone, is the color of the object without any special lighting. Put the base tone down first after drawing the object correctly and cleaning up any sketchy lines.
Blend the base tone smooth with the largest blending tool you can for the area; a chamois wrapped around your finger if possible, a large stomp or tortillon if the cup is too small for you to use a chamois.
When the base tone is smooth, look for the shadows.
There are two kinds of shadows: shadows on the object itself help to explain the shape, surface, and dimension of the object.
Cast shadows are cast by the object onto the ground, and so may pick up some elements of the object, such as the shape of the handle in the case shown above.
Cast shadows also help determine the strength, direction and placement of the light source.
The stronger the light is, the darker the shadow will be. When the light source is directly above the object, the cast shadow is very short.
As the light moves to one side, the shadow lengthens. The cast shadow is always darkest closest to the object and lightens as it moves away.
Highlights also help describe the light source and the surface of the object.
Smooth, reflective surfaces reflect more light than soft objects, fur, wood or similar substances, and so the highlights will be very distinct.
There will often be multiple highlights, especially on the side of the object that sticks out and so catches the most light.
But anything three dimensional that has any lighting at all will have a highlight, just as it has midtone and shadow.
Finally, don’t forget the lines of reflected light. These are often overlooked, because we tend to flatten shapes and blend subtle tone variations together.
The casual observer doesn’t necessarily need to see all of the information that light tells us about an object; he or she can see just enough to recognize the object, “mug” and go on happily.
But the artist needs to see more. The shadow side of an object is lifted out of flatness by a very subtle but important line of reflected light that shows how the mug is curved back.
There are reflected lights around the outer edge of many, many things as they curve back; look for them in the nose, mouth, and chin as you draw portraits.
Want To Learn More…
 Learn how to add life to your pencil portraits.
Did you know that a portrait can still look realistic and striking with very little blending by paying attention to shapes and lighting?
Something as simple as that can make a huge difference in your drawings and we can show you plenty of helpful techniques to add life to your pencil portraits.


